


Sauna, Cold Plunge, and Red Light Therapy Routine for Home Recovery
Home recovery spaces are becoming less of a luxury extra and more of a practical part of how people care for their bodies. Instead of treating recovery as something squeezed in after everything else, homeowners are building routines around heat, cold, light, movement, and rest.
Sauna, cold plunge, and red light therapy each bring something different to the table. Heat can help create a slower wind-down. Cold exposure can feel mentally sharp and refreshing for some people. Red light therapy can add a simple recovery layer that is easy to use before or after training. None of these tools need to be treated like magic. The best routine is safe, repeatable, and built around how your body actually responds.
Ahead, we’ll look at how sauna, cold plunge, and red light therapy can work together, how to sequence a simple home recovery session, and which NW Immersion products can help you build a setup that fits your space.
Why Combine Sauna, Cold Plunge, and Red Light Therapy?
Sauna, cold plunge, and red light therapy each play a different role in a recovery routine. Used together, they can create a clear rhythm: warm up, cool down, reset, and recover.
The goal is not to chase the most extreme version of each practice, but to build a routine that feels useful enough to keep.
Sauna creates the heat and wind-down phase
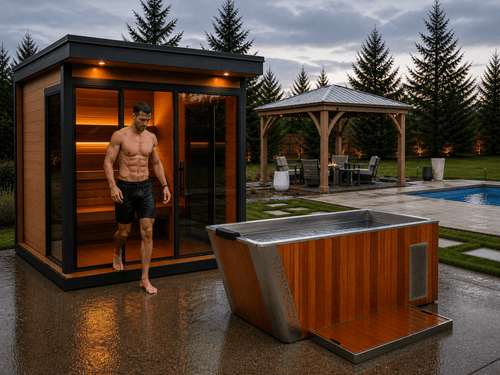
Sauna is often the anchor of a home recovery routine because heat creates a natural pause. After a workout, a long day, or a heavy week, a sauna session can help the body settle into a slower state and make recovery feel more deliberate.
Traditional saunas and infrared saunas can both fit this role. A traditional sauna offers a classic high-heat experience, while an infrared sauna may appeal to people who prefer a gentler heat profile or a more compact indoor setup.
Cold plunge creates the contrast phase
Cold plunging is usually the sharpest part of the routine. After heat exposure, cold water can feel like a reset button: brisk, clarifying, and very hard to ignore.
That does not mean everyone should jump into extreme cold right away. Cold exposure should be approached gradually, especially for beginners. People with heart conditions, blood pressure concerns, pregnancy, fainting episodes, cold sensitivity, or other medical issues should ask a healthcare professional before using a cold plunge tub.
Red light therapy creates the low-friction recovery layer
Red light therapy is appealing because it can be simple to add. People use red and near-infrared light before training, after training, during stretching, or as part of an evening recovery routine.
For home sauna users, the Sauna Elite Red & Near Infrared Therapy Panel adds a more specific advantage: it allows red and near-infrared therapy to be used inside a sauna environment when installed and used as directed. That makes it a practical option for people who want to combine heat and light in one recovery space.
The best routine is structured
A good recovery routine should not feel like a dare. Longer sauna sessions, colder plunges, and more complicated protocols are not automatically better.
A better approach is to create a sequence you can repeat safely. Start with manageable sessions, pay attention to how your body responds, hydrate well, and stop if heat or cold starts to feel wrong instead of restorative.
The Best Sauna, Cold Plunge, and Red Light Therapy Sequence
A simple sequence can make home recovery feel more intentional: start with red light therapy, move into sauna heat, then finish with cold exposure if your body tolerates it well.
The exact timing should depend on your experience level, comfort, health status, and goals.
Start with red light therapy
Red light therapy can be a gentle way to begin a recovery session. Some people use it while stretching, breathing, or easing out of workout mode before moving into the sauna.
This is also where the Sauna Elite Red & Near Infrared Therapy Panel can fit naturally. It gives home sauna owners a way to bring red and near-infrared light into the routine without needing a completely separate recovery station.
Use the Sauna Elite inside a traditional sauna

Most standard red light panels are not designed to operate inside a hot traditional sauna. The Sauna Elite Red & Near Infrared Therapy Panel is built specifically for sauna integration, with sauna-rated performance up to 215°F.
Key features include:
-
Red and near-infrared light therapy
-
Sauna-rated construction up to 215°F
-
Plug-and-play setup
-
Remote control and custom settings
-
Premium stand included
This makes Sauna Elite a strong option for homeowners who want to combine heat and light in one session instead of moving between separate devices and rooms.
Move into the sauna session
After red light therapy, the sauna becomes the main heat phase. Users treat this as the part of the routine where the body warms, the pace slows, and recovery feels more focused.
NW Immersion carries several traditional sauna options for this kind of setup, including Leil Saunas, Golden Designs Saunas, and Saunalife Saunas. The right choice depends on your space, preferred heat style, and whether you want an indoor, outdoor, or backyard sauna experience.
Choose traditional sauna for a classic heat ritual
Traditional saunas are ideal for people who want the classic sauna atmosphere: higher ambient heat, wood-rich surroundings, and the option for steam depending on the heater and setup.
This is likewise where Sauna Elite becomes useful. Since it is designed for sauna environments, it can be added to a traditional sauna routine for people who want heat and red or near-infrared light working in the same space.
Choose infrared sauna for gentler heat
Infrared saunas may appeal to people who want a lower-ambient-temperature sauna experience. They can work well in home gyms, spare rooms, garage wellness spaces, or other indoor areas where a traditional sauna may not be the best fit.
NW Immersion’s infrared sauna options include Golden Designs Infrared Saunas, the Golden Designs Reserve Collection, and Dynamic Low EMF Infrared Saunas. These are good directions to explore if you want a compact, indoor-friendly recovery setup.
Finish with the cold plunge if it suits your body
Cold plunge can serve as the final contrast step after heat. For people who tolerate cold exposure well, it can create a clean ending to the session and leave the body feeling alert.
Beginners should keep cold exposure conservative and stop if they feel dizzy, numb, faint, or unwell.
NW Immersion’s Plunges & Tubs collection is the natural product path here for homeowners who want to build a complete sauna-and-cold-plunge routine.
Sample Recovery Routines by Experience Level

A recovery routine should match the person using it. Beginners usually need less intensity and fewer rounds, while experienced users may build longer contrast sessions over time.
Beginner routine
A beginner routine should feel easy to complete, not intimidating. Start with short sessions, longer rest periods, and close attention to how your body responds.
A simple flow might look like this:
-
Red light therapy: 5–10 minutes
-
Sauna: 10–15 minutes
-
Cold plunge: brief exposure only if tolerated
-
Rounds: 1
The goal is not to prove toughness but to learn how heat, cold, and light fit into your recovery without overwhelming your system.
Intermediate routine
An intermediate routine can combine red light therapy and sauna more efficiently, especially if you are using the Sauna Elite Red & Near Infrared Therapy Panel inside your sauna.
A sample flow might look like this:
-
Red light therapy + sauna: 15–20 minutes
-
Cold plunge: short, controlled session
-
Rounds: 1–2
At this stage, consistency matters more than intensity. A routine you can repeat twice a week is more useful than an ambitious session you avoid because it feels like a small expedition.
Advanced routine
An advanced routine may include longer sauna sessions, controlled cold plunges, and multiple rounds. This should be reserved for people who already tolerate heat and cold well.
A sample flow might look like this:
-
Sauna Elite during sauna session
-
Sauna: longer session if well tolerated
-
Cold plunge: controlled session
-
Rounds: multiple rounds only for experienced users
Even advanced users should treat symptoms seriously. Dizziness, nausea, chest discomfort, numbness, or feeling faint are reasons to stop, not signals to push harder.
Recovery-day routine
A recovery-day routine should feel lighter than a training-day routine. Red light therapy, gentle sauna use, stretching, hydration, and rest may be enough.
Cold plunge can be skipped if it feels too sharp for the day. Recovery does not need to be dramatic to be useful. Some days, the best session is the one that helps the body settle rather than asking it to handle another challenge.
Post-workout routine
After a workout, give your body a short transition before moving into recovery tools. Hydrate, cool down, and let your breathing return to normal before starting a sauna or cold plunge session.
A practical post-workout flow might include red light therapy or sauna first, then a short cold plunge if desired. Keep the routine simple enough that it supports training instead of making the whole session feel like a second workout.
How to Build a Luxury Home Wellness Retreat Without Overcomplicating It
A home recovery space works best when it fits your space, routine, and comfort level. The goal is not to collect every wellness tool at once, but to build a setup that makes recovery easier to repeat.
Start with the main habit you want to support
Start with the habit that matters most to you. If you want heat and relaxation, begin with a sauna. If you want contrast therapy, add a cold plunge. If you want a simple daily recovery layer, red light therapy may be the easier first step.
This keeps the space practical.
Plan around the space you have
A home wellness setup can work in a backyard, garage gym, spare room, patio area, or dedicated recovery room. The best layout depends on ventilation, flooring, water access, privacy, and how naturally the space fits into your day.
A compact indoor setup may call for an infrared sauna and red light panel. A backyard retreat may work better with an outdoor sauna and cold plunge.
Choose products that can work together
The best recovery spaces feel connected. A sauna should pair naturally with nearby hydration, towels, seating, and, if desired, cold exposure. Red light therapy should be placed where it is easy to use, not tucked into a corner where it becomes decorative equipment.
NW Immersion’s product path can support that kind of setup through our traditional sauna collections, infrared sauna collections, and Plunges & Tubs.
Keep safety and comfort built into the routine
Safety should be part of the design from the beginning, especially when heat and cold exposure are involved. A beautiful wellness space still needs to be easy to use, easy to exit, and easy to maintain.
Useful details include:
-
Water within reach
-
Non-slip flooring
-
Towels and seating
-
Clear walking paths
-
Good ventilation
-
Easy temperature control
Small details like these make the space feel less like a showroom and more like something you can live with.
Design for repeat use
A home wellness retreat should look good, but beauty alone will not keep the routine alive. Convenience, comfort, and flow matter more over time.
Put the sauna, cold plunge, red light panel, and accessories where they make sense for your actual habits. The goal is a space you return to often, not one that only looks impressive when the lights are perfect.
Explore NW Immersion’s Sauna, Cold Plunge, and Red Light Therapy Collections

Ready to build a recovery space that fits your home and your routine? Explore NW Immersion’s sauna, cold plunge, red light therapy, and wellness collections, or contact our team for help choosing the right setup.


